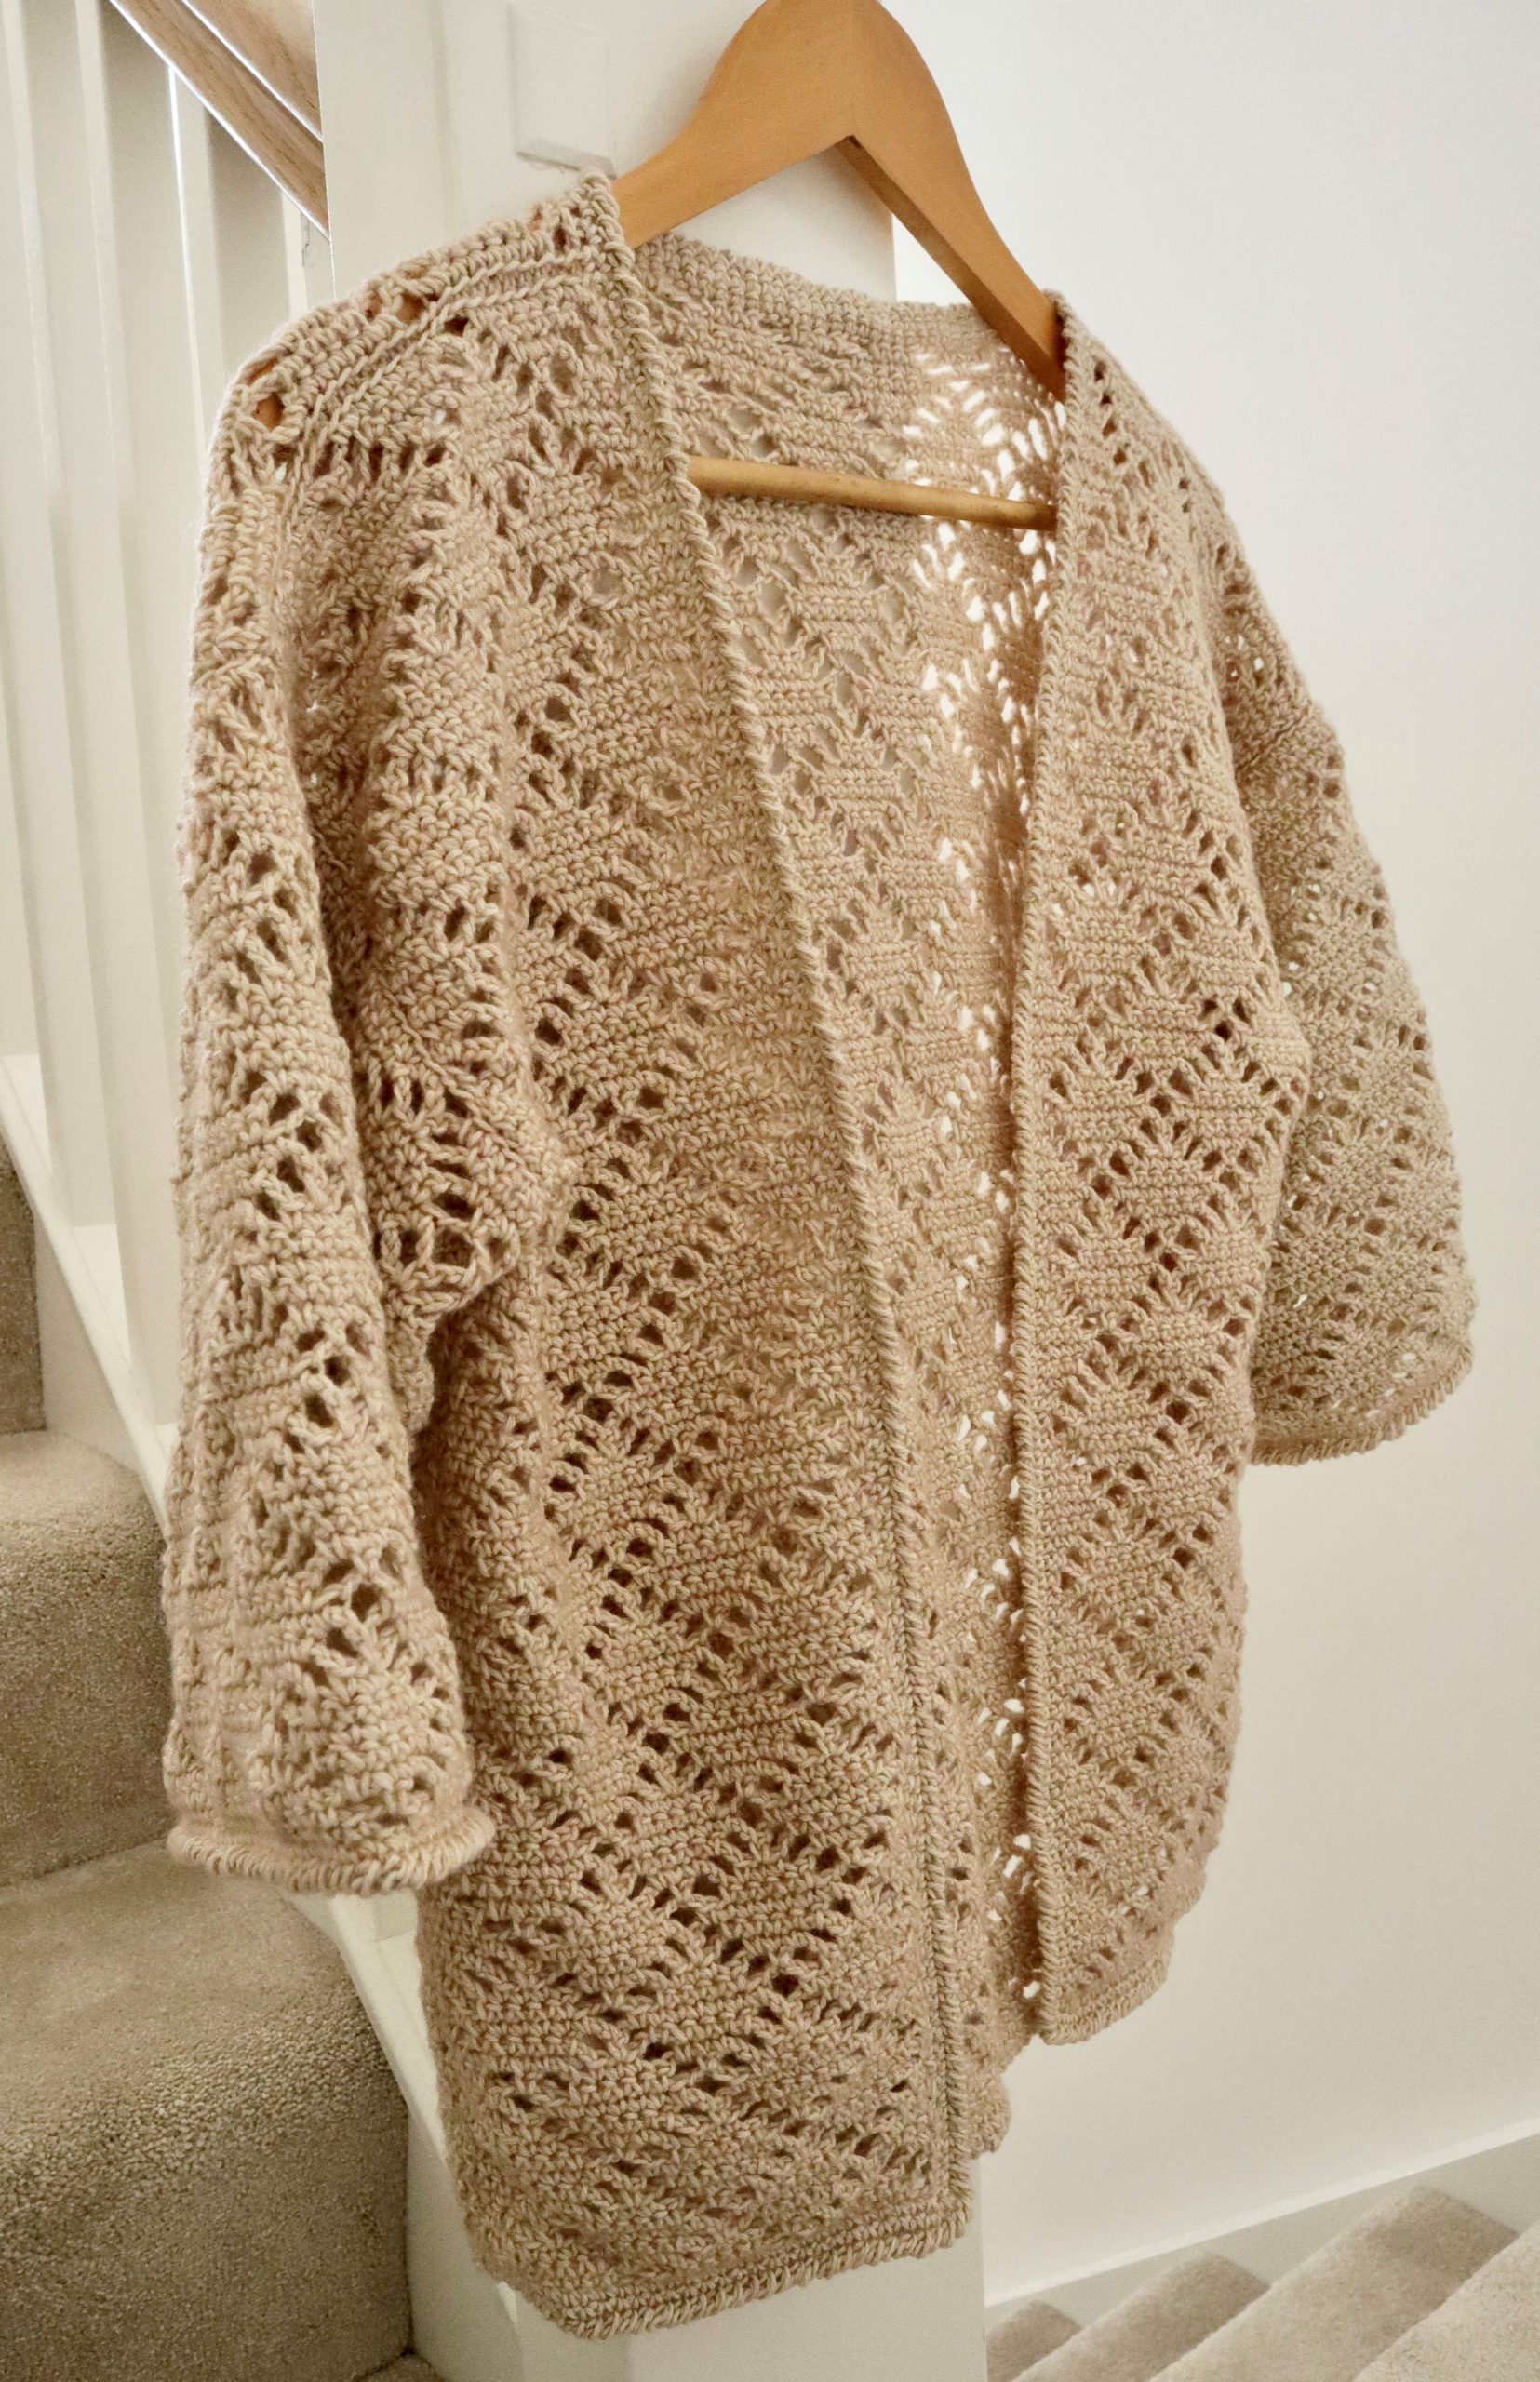
The Laura Cardigan is a beginner friendly crochet cardigan; it is the perfect layering option when you need that something extra over your t-shirt or a blouse. The Diamond stitch pattern is deceptively easy to crochet and memorize, so your stitches will be flying off the hook, and your piece will be finished before you know it.
When I designed this crochet cardigan, I aimed to create a simple garment with the easiest possible construction, while adding a little sophistication using the diamond stitch pattern. This is done using chains, single and double crochet, so even crochet beginners can have a go at this pattern, as these are the stitches that new crocheters learn at first.
You can purchase the add free PDF version of the pattern at LoveCrafts here and Ravelry here.
This site contains affiliate links to products. We may receive a commission for purchases made through these links at no extra cost to you. This helps to cover the running cost of the website and enables me to continue making free patterns.
Please NOTE that this pattern is subject to copyright and is my intellectual property. The online version is for personal use only. Do not re-publish or sell this pattern in part or full or make video tutorials of it. Any such actions are a breach of copyright and can result in legal action.

Skills required:
To create this beautiful crochet cardigan, you will need to master (or already know) these stitches and techniques:
Chain, single crochet (sc), double crochet (dc), reverse single crochet (reverse sc), Locking Mattress Stitch, blocking.
Skill level:

Finished measurements:
The final crochet cardigan measurements (blocked):
XSmall (Small, Medium, Large, XL, 2X, 3X, 4X, 5X)
Neckline 3.75 (5.5, 6.75, 5.5, 5.5, 6.75, 5.5, 6.75, 5.5)”
Bust 37.5 (42, 46.5, 51.5, 51.5, 56, 60.5, 65.5, 70)”; garment is meant to be worn with 5.5-9.5” of positive ease
Length 22.5 (22.75, 23.25, 22.75, 22.75, 23.25, 22.75, 23.25, 22.75)”
Materials and tools:
To get the exact look as on the pictures of my crochet cardigan, you will need:
Scheepjes Stone Washed (78% Cotton, 22% Acrylic | sport weight yarn | 50 g (1.75 oz) = 130 m (142 yds), Axinite (#831) 9 (9, 10, 11, 11, 12, 13, 13, 14) balls

3.5 mm (E/4) crochet hook or size to obtain the gauge
Tapestry needle
Scissors
You can get your craft supplies here.

Gauge:
Blocked Gauge:
15 sc and 15 rows = 4”/10 cm
1 horizontal st pattern repeat = 2.33”/6 cm
1 vertical st pattern repeat = 2”/5 cm
Gauge helps you to understand how the project turns out in terms of the final size. If you would like to achieve the exact size of the final project as in the instructions above, you gauge needs to match exactly to the above.
If you get more stitches and/or rows than stated above using the exact hook size as per instructions, your final project will turn out smaller. Conversely, if you get less stitches and/or rows than stated above using the exact hooks size as per instructions, your final project will turn out bigger.
To make adjustments, if you get more stitches and/or rows, you can try using bigger hook size to get closer to the desired size. Conversely, if you get less stitches and/or rows, you can try using smaller hook size to get closer to the desired size.
It may take trial and error to try out a few hook sizes to achieve the exact size.
Alternatively, if you really don’t want to make several samples to achieve the desired size, you can try to alter your tension as you work the project. However, I would advise to try this out once you master the basics of crochet as it may be a bit tiresome to try to master the basics of crochet and focus on alternating your tension while working the project.
Laura Cardigan Schematic:

Stitch guide:
Single crochet– insert hook into indicated st, yrh, pull up a lp (2 lps on hook), yrh, pull through 2 lps on hook.
Double crochet– yrh, insert hook into indicated st, yrh, pull up a lp (3 lps on hook), [yrh, pull through 2 lps on hook] twice.
Reverse single crochet– working from left to right, insert hook from front to back under top lp of designated st, yrh and pul, yrh and pull through 2 lps.
Locking Mattress Stitch– place panels RS together with edges aligned side by side, sts will be worked through the outer lps of each edge. Thread yarn through the yarn needle and start the seam by inserting needle from left to right through first sts of both panels at bottom. *Move 1 st up on right side, insert needle from right to left and continue to first st on left side (the one already worked into), move 1 st up on left side, insert needle from left to right and continue to last st worked into on the right side; rep from * to end. Fasten off.

| Abbreviations: | |
| ch- chain | yrh- yarn round the hook |
| st(s)- stitch(es) | pul- pull up a loop |
| lp(s)- loop(s) | RS- right side |
| sc- single crochet | WS- wrong side |
| dc- double crochet | approx.- approximately |
| rep- repeat | RS- right side |
| sp- space |
Stitch chart:

Notes:
Similar fine weight yarns may be substituted to make this crochet cardigan; please check gauge.
Beginning ch-1 does NOT count as stitch.

Instructions:
Crochet Cardigan
Front Panel (make 2)
Ch 34 (34, 34, 43, 43, 43, 52, 52, 61).
Row 1 (RS): Sc in 8th ch from hook, sc in next 6 chs, *ch 3, skip 2 chs, sc in next 7 chs; rep from * to last 2 chs, ch 2, dc in last st, turn. 29 (29, 29, 38, 38, 38, 47, 47, 56) sts.
Row 2: Ch 1, sc in 1st st, *ch 3, skip next sc, sc in next 5 sc, ch 3, skip next sc, sc to 2nd ch of ch-3 sp; rep from * to end with the last sc being worked to 3rd ch of ch-3 sp, turn.
Row 3: Ch 1, sc in 1st st, *sc in ch-3, ch 3, skip next sc, sc in next 3, ch 3, skip next sc, sc in next ch-3 sp, sc in next sc; rep from * to end, turn.
Row 4: Ch 1, sc in 1st st, sc in next sc, sc in next ch-3 sp, ch 3, skip next sc, sc in next sc, skip next sc, *ch 3, sc in ch-3 sp, sc in next 3 sc, sc in next ch-3 sp, ch 3, skip next sc, sc in next sc, skip next sc; rep from * to last ch-3 sp, ch 3, sc in next ch-3 sp, sc in next 2 sc, turn.
Row 5: Ch 1, sc in 1st st, sc in next 2 sc, sc in ch-3 sp, ch 3, sc in next ch-3 sp, *sc in next 5 sc, sc in next ch-3 sp, ch 3, sc in next ch-3 sp; rep from * to last 3, sc in next 3 sc, turn.
Row 6: Ch 1, sc in 1stcst, sc in next 2 sc, skip next sc, ch 3, sc to 2nd ch of ch-3 sp, ch 3, skip next sc, *sc in next 5 sc, ch 3, skip next sc, sc to 2nd ch of ch-3 sp, ch 3, skip next sc; rep from * to last 3 sc, sc in last 3 sc, turn.
Row 7: Ch 1, sc in 1st st, sc in next st, ch 3, skip next sc, sc in next ch-3 sp, sc in next sc, sc in next ch-3 sp, * ch 3, skip next sc, sc in next 3 sc, ch 3, skip next sc, sc in next ch-3 sp, sc in next sc, sc in next ch-3 sp; rep from * to last 3, ch 3, skip next sc, sc in next 2 sc, turn.
Row 8: Ch 1, sc in 1st st, ch 3, skip next sc, sc in next ch-3 sp, sc in next 3 sc, sc in next ch-3 sp, ch 3, *skip next sc, sc in next sc, ch 3, skip next sc, sc in next ch-3 sp, sc in next 3 sc, sc in next ch-3 sp, ch 3; rep from * to last 2 sc, skip next sc, sc in last sc, turn.
Row 9: Ch 5, sc in next ch-3 sp, sc in next 5 sc, sc in next ch-3 sp, *ch 3, sc in next ch-3 sp, sc in next 5 sc, sc in next ch-3 sp; rep from * to last st, ch 2, dc in last sc, turn.
Rows 10–89: Rep Rows 2-9.
Fasten off.
Back Panel
Ch 79 (88, 97, 106, 106, 115, 124, 133, 142).
Row 1 (RS): Sc in 8th ch from hook, sc in next 6 chs, *ch 3, skip 2 chs, sc in next 7 chs; rep from * to last 2 chs, ch 2, dc in last ch, turn. 74 (83, 92, 101, 101, 110, 119, 128, 137) sts.
Rows 2–81: Rep Rows 2-9 of Front Panel.
Rows 82-87: Rep Rows 2-7.
Back Neck Shaping Right
Row 88: Ch 1, sc in 1st st, ch 3, skip next sc, sc in next ch-3 sp, sc in next 3 sc, sc in next ch-3 sp, ch 3, [skip next sc, sc in next sc, ch 3, skip next sc, sc in next ch-3 sp, sc in next 3 sc, sc in next ch-3 sp, ch 3] 2 (2, 2, 3, 3, 3, 4, 4, 5) times, skip next sc, sc in last sc, turn. 29 (29, 29, 38, 38, 38, 47, 47, 56) sts.
Row 89: Rep Row 9.
Fasten off.
Back Neck Shaping Left
Re-attach yarn approximately 7 (7, 7, 9.25, 9.25, 9.25, 11.75, 11.75, 14)” from the left edge in the middle sc of diamond that is being reduced. This corresponds to the width of the Front Panel, which can be used to ensure the yarn is attached correctly by aligning the top and left edge with the corresponding Back Panel edges.
Row 88: Ch 1, sc in 1st st, ch 3, skip next sc, sc in next ch-3 sp, sc in next 3 sc, sc in next ch-3 sp, ch 3, [skip next sc, sc in next sc, ch 3, skip next sc, sc in next ch-3 sp, sc in next 3 sc, sc in next ch-3 sp, ch 3] 2 (2, 2, 3, 3, 3, 4, 4, 5) times, skip next sc, sc in last sc, turn. 29 (29, 29, 38, 38, 38, 47, 47, 56) sts.
Row 89: Rep Row 9.
Fasten off.
Sleeve (make 2)
Ch 79 (79, 79, 88, 88, 97, 106, 106, 115).
Row 1 (RS): Sc in 8th ch from hook, sc in next 6 chs, *ch 3, skip 2 chs, sc in next 7 chs; rep from * to last 2 chs, ch 2, dc in last, turn. 74 (74, 74, 83, 83, 92, 101, 101, 110) sts.
Rows 2–25: Rep Rows 2-9 of Front Panel.
Fasten off Sizes 4X and 5X.
Rows 26–33: Rep Rows 2-9.
Fasten off all remaining sizes except for S.
Rows 34–41: Rep Rows 2-9.
Fasten off.
Finishing:
Weave in all ends and block panels to measurements in schematic.
With Front and Back Panels RS together, sew shoulder seems using the Locking Mattress Stitch.
With panels RS together, place st markers approximately 9 (9, 9.5, 10, 10.75, 11.75, 12.5, 13.25, 13.75)” down from shoulder seams. Fold sleeves in half with RS together and sew in sleeves between makers. Sew side seams. Sew sleeve seams. Weave in all ends from seaming.
Sc Edging Body
Attach yarn at a side seam with garment RS facing.
Round 1: Ch 1, sc in 1st and each stitch around.
All Sizes except XS
Round 2: Rep Round 1.
Sizes M, 2X, 4X
Rounds 3-4: Rep Round 1.
Do NOT Fasten off, continue working reverse sc edging.
Reverse sc Edging Body
Round 1: *working from left to right, insert hook from front to back under top loop of designated st, yrh and pul, yrh and pull through 2 lps; rep from * in each stitch around.
Fasten off.
Sc Edging Sleeves
Attach yarn at a sleeve seam with sleeve RS facing.
Round 1: Ch 1, sc in 1st and each stitch around.
Do NOT Fasten off, continue working reverse sc edging.
Reverse sc Edging Sleeves
Round 1: *working from left to right, insert hook from front to back under top loop of designated st, yrh and pul, yrh and pull through 2 lps; rep from * in each stitch around.
Fasten off.
Weave in all ends from edging. Lightly re-block if needed to reshape after seaming.
Enjoy your new crochet cardigan!
I would love to see and share your work on social media, use #lauracardigan or #exquisitecrochetuk.
Pattern support: exquisite.crochet.uk@gmail.com
You can purchase the add free PDF version of the pattern at LoveCrafts here and Ravelry here.
Further resources:
Stitch pattern video tutorial (this is a basic video of the stitch pattern rather than step by step instructions on how to make the whole crochet cardigan):
For endless crochet inspiration, you can subscribe to AllFreeCrochet website here.
If you prefer to have all your craft inspiration in one place, FaveCrafts is definitely the place to go. Why not subscribe to their newsletter here so you would not miss a thing!
Did you enjoy the Laura Cardigan pattern? Why not try my other crochet patterns:


Thank you so much if you got this far in the pattern! I hope you got inspired for your own version using various colours. I can’t wait to see it! Don’t forget to tag me on Instagram and let me know in the comment section below how you got on with it! As always, if you have any pattern query, the quickest way to get it answered is by emailing me on the pattern support email address above.
Happy crocheting!


Your sweater is gorgeous. Cannot wait to start, and finish, so I can wrap it around this old body. Thank you for sharing.
Thank you! I am glad you like the pattern.