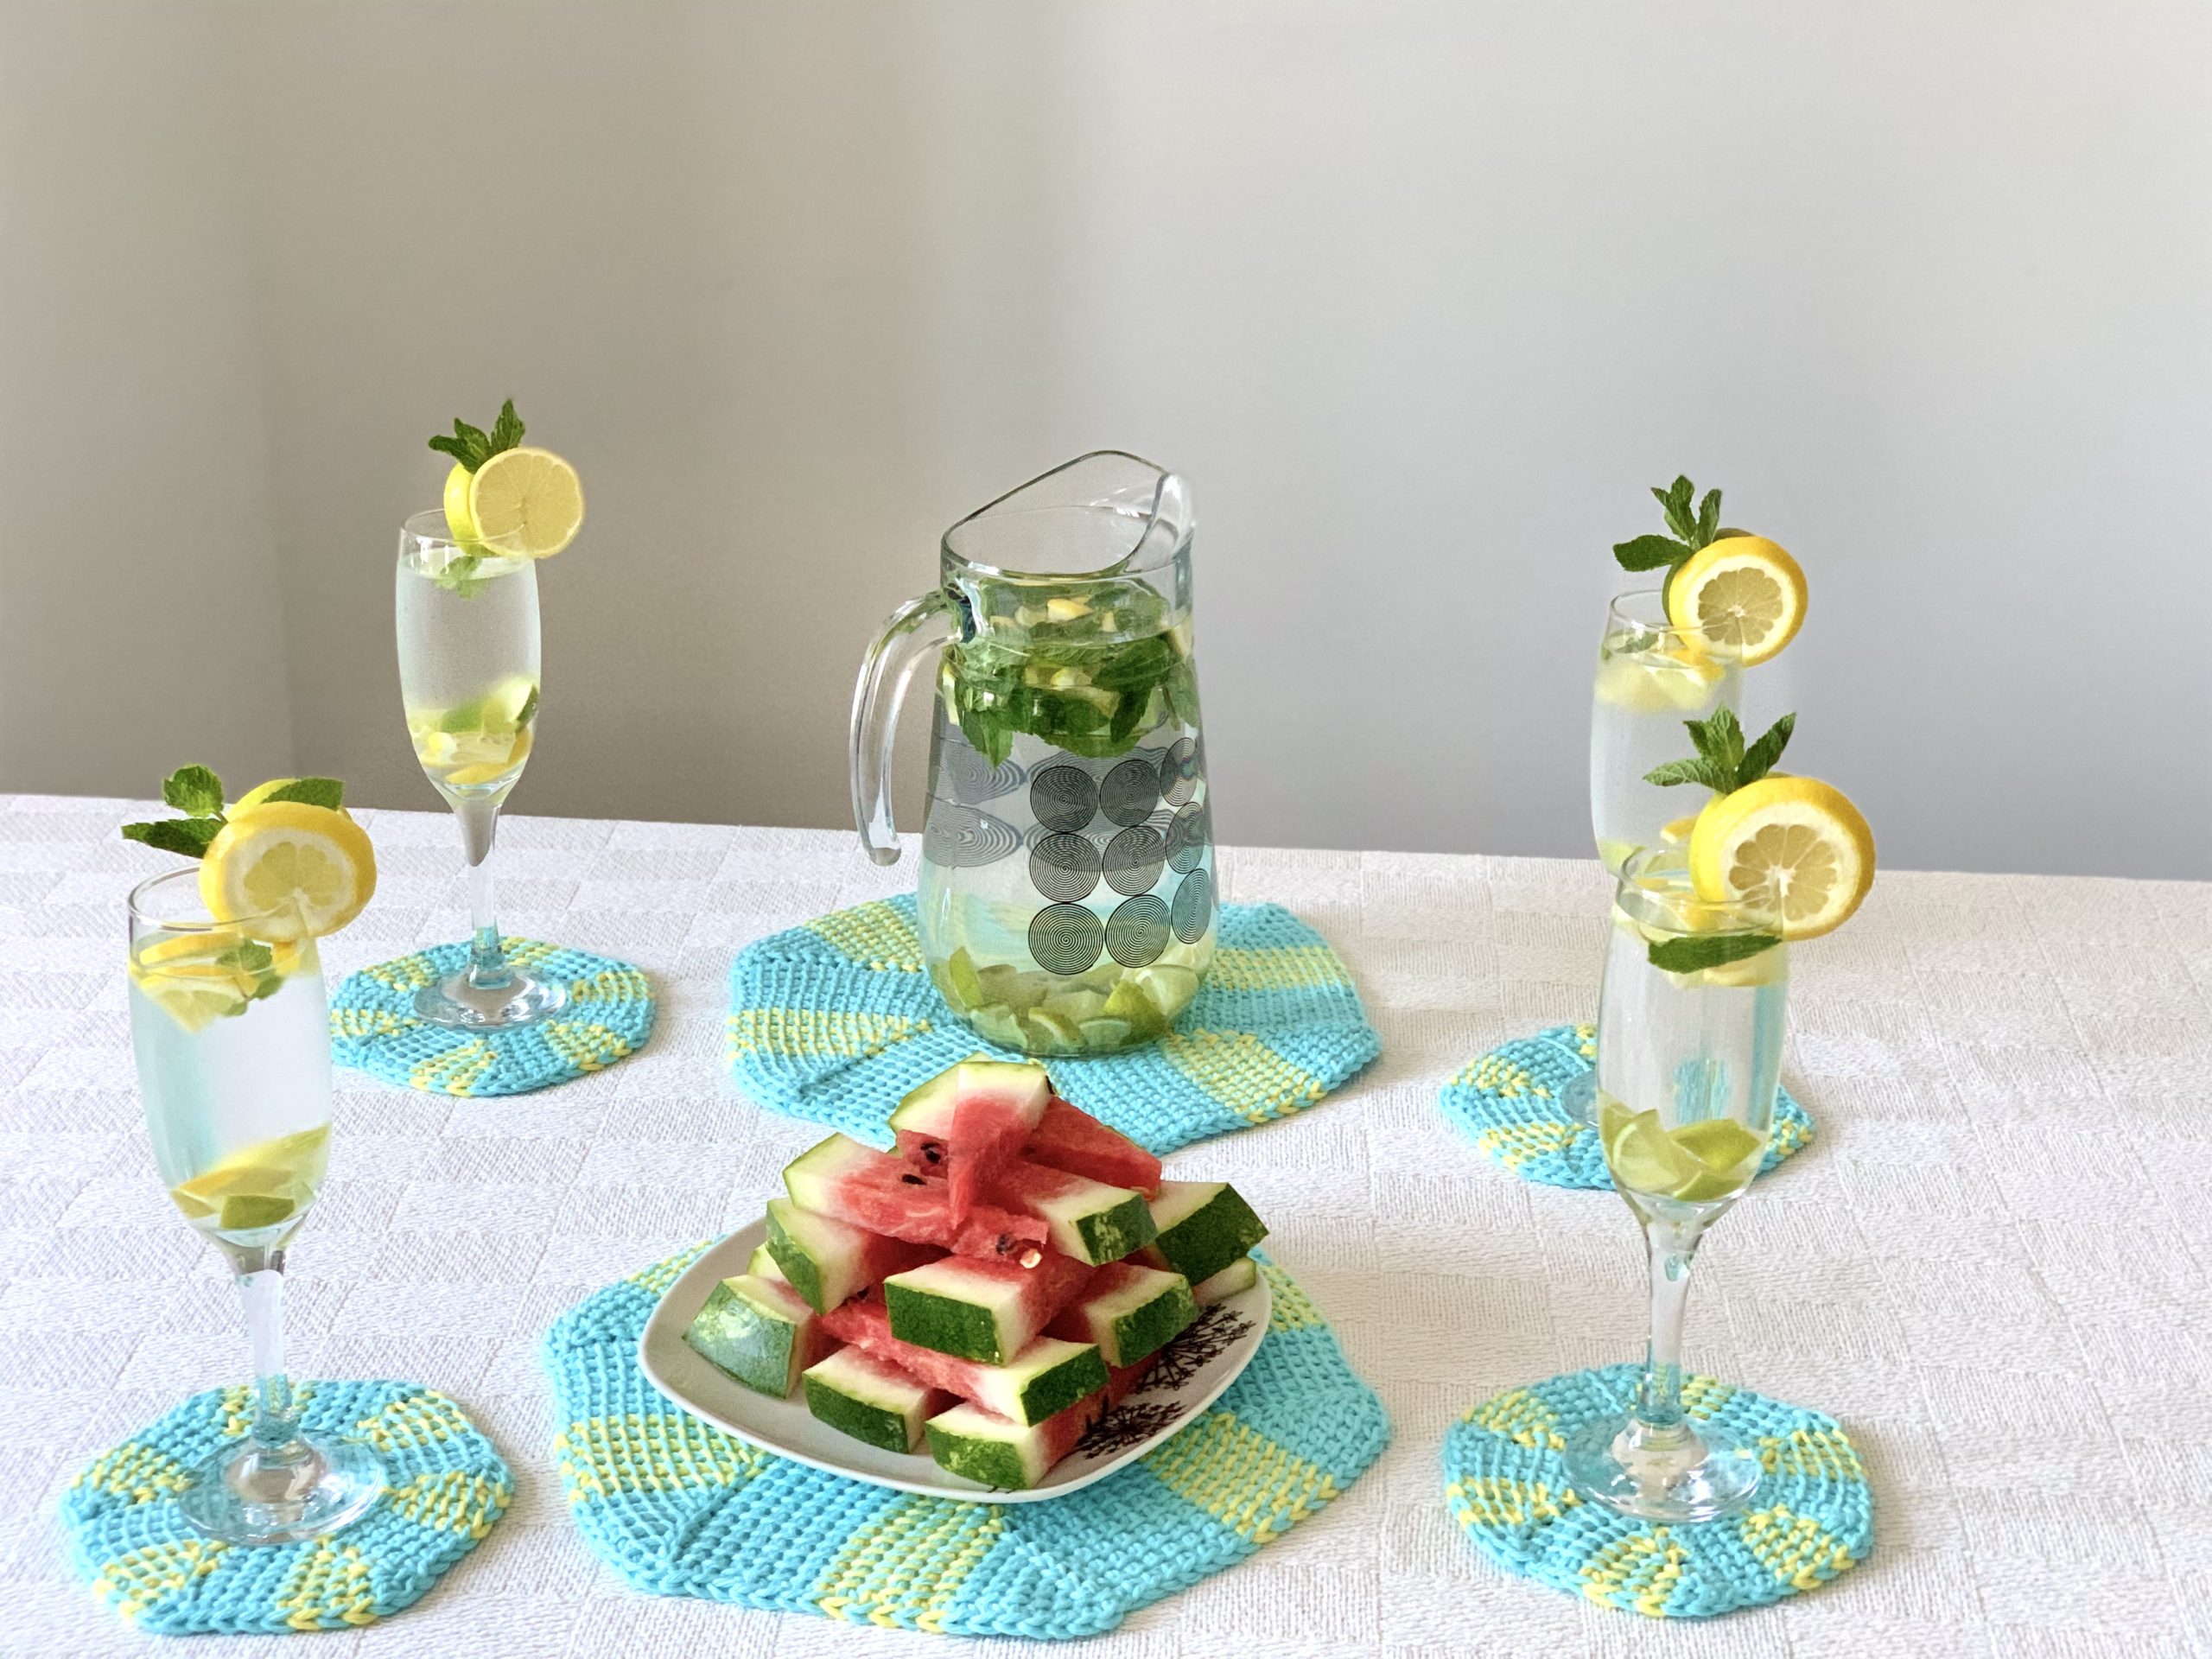
The Al Fresco Dining Set is the perfect accessory to decorate your table for your outdoor dining during summer months and beyond. The vibrant colours are reminiscent of turquoise blue seashores with golden sand; they bring back cherished memories of joyous, carefree holidays, that were once lived but remembered forever.
This is easy beginner friendly project that would make an amazing introduction to Tunisian crochet if you don’t want to commit to something bigger, such as blanket or a garment, but want to make something nice and usable rather than a swatch (although there is nothing wrong with swatching to learn a new technique or practise new stitches, some of use have an immense fun “just swatching”).
You can make a start with one colour at first to practise the stitches and technique of joining segments one onto another and gradually add the second colour. In fact, using more than two colours can be a fantastic way to use up some left-over yarn from other projects. You know, those odd bits that are too big to use as a stuffing or throw away but too small for any meaningful small project like a hat or a headband.
The set is worked using Tunisian crochet technique and consists of four coasters and four placemats (although you can make as many as you like! Just be mindful of the fact that the yardage in the pattern notes is specifically calculated for 4 piece set).
You can purchase the add free PDF version of the pattern at LoveCrafts here and Ravelry here.
This site contains affiliate links to products. We may receive a commission for purchases made through these links at no extra cost to you. This helps to cover the running cost of the website and enables me to continue making free patterns.
Please NOTE that this pattern is subject to copyright and is my intellectual property. The online version is for personal use only. Do not re-publish or sell this pattern in part or full, or make video tutorials of it. Any such actions are a breach of copyright and can result in legal action.

Skills required:
Chain, Tunisian crochet technique (alternating forward and backward passes), Tunisian simple stitch (tss), changing colours, decreasing in Tunisian crochet on return pass, blocking.
Skill level:

Finished measurements:
Final measurements (blocked):
Coaster: 14 cm (5.5 in) in diameter
Table mat: 29 cm (11.5 in) in diameter
Materials and tools:
Yarn and Colors Epic (100% Cotton | worsted | 50 g (1.75 oz) = 75 m (82 yds)), Opaline Glass (MC) #074 5 skeins, Golden Glow (CC) #011 2 skeins
You can substitute the yarn for other fiber types, I think a bamboo and cotton blend or acrylic and cotton blend would make a wonderful alternatives, but the final amount of yarn you will need will change from the above.

Tunisian crochet hook size 5 mm (H-8) with cable (at least 10 cm (4 in)) or size to obtain the gauge
Tapestry needle
Scissors
You can get your craft supplies here.
Gauge:
Blocked Gauge:
14 sts x 14 rows = 10 x 10 cm (4 x 4”)
Gauge helps you to understand how the project turns out in terms of the final size. If you would like to achieve the exact size of the final project as in the instructions above, you gauge needs to match exactly to the above.
If you get more stitches and/or rows than stated above using the exact hook size as per instructions, your final project will turn out smaller. Conversely, if you get less stitches and/or rows than stated above using the exact hooks size as per instructions, your final project will turn out bigger.
To make adjustments, if you get more stitches and/or rows, you can try using bigger hook size to get closer to the desired size. Conversely, if you get less stitches and/or rows, you can try using smaller hook size to get closer to the desired size.
It may take trial and error to try out a few hook sizes to achieve the exact size.
Alternatively, if you really don’t want to make several samples to achieve the desired size, you can try to alter your tension as you work the project. However, I would advise to try this out once you master the basics of Tunisian crochet as it may be a bit tiresome to try to master the basics of Tunisian crochet and focus on alternating your tension while working the project.

Stitch guide:
Tunisian crochet stitches are worked in forward and return pass from right to left, with the number of stitches (loops) increasing on the hook during the forward pass and decreasing during the return pass.
Return pass is worked in the same way for all stitches (rows of stitches) as follows: 1 ch, *yrh, draw through 2 loops on hook, rep from * until 1 loop on hook.
Decreasing on return pass: yrh, draw through 2 loops (decrease made), *yrh, draw through 2 loops; rep from * until 1 loop on hook.
Edge stitches:
Right edge stitch- This is the first stitch and is not usually worked into because there is one loop on the hook left after completing the return pass of the previous row. This one loop corresponds to the first stitch of the new row.
Left edge stitch- This stitch is referred to in the pattern as the End Stitch and is crocheted as follows: Rotate the end of the fabric towards yourself, insert the hook under both bars (left and right) of the last st, yrh and pul.
- First row of Tunisian crochet: Insert the hook in the back bump of second ch from hook, yrh and pul across. Standard return pass.
- Tunisian simple stitch: Insert the hook from right to left under front vertical bar of the next st, yrh and pul. Standard return pass.
Changing colours: In this project, the new colour is added when starting the return pass and all loops are on the hook. Yrh with the new colour and draw through 2 loops ensuring that the new colour is placed over the strand of old colour locking it in place.
If you prefer to see the stitches being worked rather than read instructions in text, I made a few videos with the basics of the Technique:
Notes:
The Set is worked flat, RS facing from right to left, and assembled using the whip stitch along the first row of the first triangular segment and ESs of the last triangular segment.
Both coasters and placemats consist of 6 identical segments worked in a round. Individual segments are created by decreasing by one stitch each row from the starting number of stitches (loops) to 3 stitches (loops). Stitches are then picked up along the edge of the previous segment to the starting number of stitches (loops). Adding segments in this manner eventually creates a circular pattern with a small hole in the middle that can be closed off when seaming the circles at the end.
(Yes, strictly speaking, these are hexagons and this is more visible when working the placemats, however we can think of it as being good enough proxy for a circle!)
Complimentary colour is added on return pass of row 4 in coasters and row 7 in placemats and alternated with the main colour for 4 and 6 rows, respectively.
The number of loops is recorded at the end of forward pass of a particular row.

Instructions:
Coaster
First segment
With MC chain 10.
Row 1 FP: Insert the hook in the back bump of second ch from hook, yrh and pul across. 10 loops on hook
Row 1 RP: Standard RP.
Row 2 FP: Tss across to the last st, ES. 10 loops on hook
Row 2 RP: Yrh, draw through 2 loops (decrease made), *yrh, draw through 2 loops; rep from * until 1 loop rem on hook.
Row 3: Rep Row 2. 9 loops on hook
Row 4 FP: Rep Row 2 FP.8 loops on hook
Row 4 RP: With CC yrh, draw through 2 loops (decrease made), *yrh, draw through 2 loops; rep from * until 1 loop on hook.
Row 5 FP: Rep Row 2 FP. 7 loops on hook
Row 5 RP: With MC, yrh, draw through 2 loops (decrease made), *yrh, draw through 2 loops; rep from * until 1 loop on hook.
Row 6 FP: Rep Row 2 FP. 6 loops on hook
Row 6 RP: Rep Row 4.
Row 7: Rep Row 5. 5 loops on hook
Row 8-9: Rep Row 2. 3 loops on hook
Second segment
Row 1 FP: Insert hook under both loops of ES of the Row below, yrh and pul across. 10 loops on hook.
Row 1 RP: Standard RP.
Rows 2-9: Rep rows 2-9 of first segment.
Third- sixth segments
Rep second segment four more times.
Fasten off leaving a long tail (approx. 25 cm (10 in)) for seaming.
Placemat
First segment
With MC chain 20.
Row 1 FP: Insert the hook in the back bump of second ch from hook, yrh and pul across. 20 loops on hook
Row 1 RP: Standard RP.
Row 2 FP: Tss across to the last st, ES. 20 loops on hook
Row 2 RP: Yrh, draw through 2 loops (decrease made), *yrh, draw through 2 loops; rep from * until 1 loop rem on hook.
Rows 3-6: Rep Row 2. 16 loops on hook
Row 7 FP: Rep Row 2 FP. 15 loops on hook
Row 7 RP: With CC yrh, draw through 2 loops (decrease made), *yrh, draw through 2 loops; rep from * until 1 loop on hook.
Row 8 FP: Rep Row 2 FP. 14 loops on hook
Row 8 RP: With MC, yrh, draw through 2 loops (decrease made), *yrh, draw through 2 loops; rep from * until 1 loop on hook.
Rows 9-12: Rep rows 7-8 twice. 10 loops on hook
Rows 13-19: Rep Row 2. 3 loops on hook
Second segment
Row 1 FP: Insert hook under both loops of ES of the Row below, yrh and pul across. 20 loops on hook
Row 1 RP: Standard RP.
Rows 2-19: Rep rows 2-19 of first segment.
Third- sixth segments
Rep second segment four more times.
Fasten off leaving a long tail (approx. 40 cm (15.75 in)) for seaming.
Finishing:
Join chain sts of first segment to ESs of last segment to form circle using the Whip stitch (See special techniques). Weave in ends and block to final measurements.
I would love to see and share your work on social media, use #mintyalfrescodiningset or #exquisitecrochetuk
Pattern support: exquisite.crochet.uk@gmail.com
Special techniques:
Whip Stitch
- Hold both edges with RS together and insert the needle from front to back through inside loops on both edges.
- Continue working through all loops along the edges (10 when seaming coasters and 20 when seaming placemats).

| Abbreviations: | |
| Ch- chain | RS- right side |
| st(s)- stitch(es) | FP- forward pass |
| ES- end stitch | RP- return pass |
| tss- Tunisian simple stitch | approx.- approximately |
| yrh- yarn round the hook | rep- repeat |
| rem- remaining | dec- decrease |
| pul- pull up a loop |
Appendix:
Step by Step photographs:
Coaster
First segment
Picture 1: Row 1 FP: Picking up loops in back bumps of chain stitches

Picture 2: Row 1 FP: All 10 loops on hook

Picture 3: Row 1 RP: Drawing through two loops on hook

Picture 4: Row 1 RP: one loop remaining on the hook at the end of return pass

Picture 5: Row 2 FP: Placement of hook during Tunisian simple stitch

Picture 6: Row 4 RP: Picking up CC yarn

Picture 7: Row 5 RP: Picking up MC yarn

Second segment
Picture 8: Row 1 FP: Picking up loops in ESs of previous segment


Further resources:
Pattern Video tutorial:
For endless crochet inspiration, you can subscribe to AllFreeCrochet website here.
If you prefer to have all your craft inspiration in one place, FaveCrafts is definitely the place to go. Why not subscribe to their newsletter here so you would not miss a thing!
Did you enjoy the Minty Al Fresco Dining Set pattern? Why not try my other home decor patterns:


Thank you so much if you got this far in the pattern! I hope you got inspired for your own version using various colours. I can’t wait to see it! Don’t forget to tag me on Instagram and let me know in the comment section below how you got on with it! As always, if you have any pattern query, the quickest way to get it answered is by emailing me on the pattern support email address above.
Happy crocheting!


One thought on “Minty Al Fresco Dining Set”
Comments are closed.