Introduction
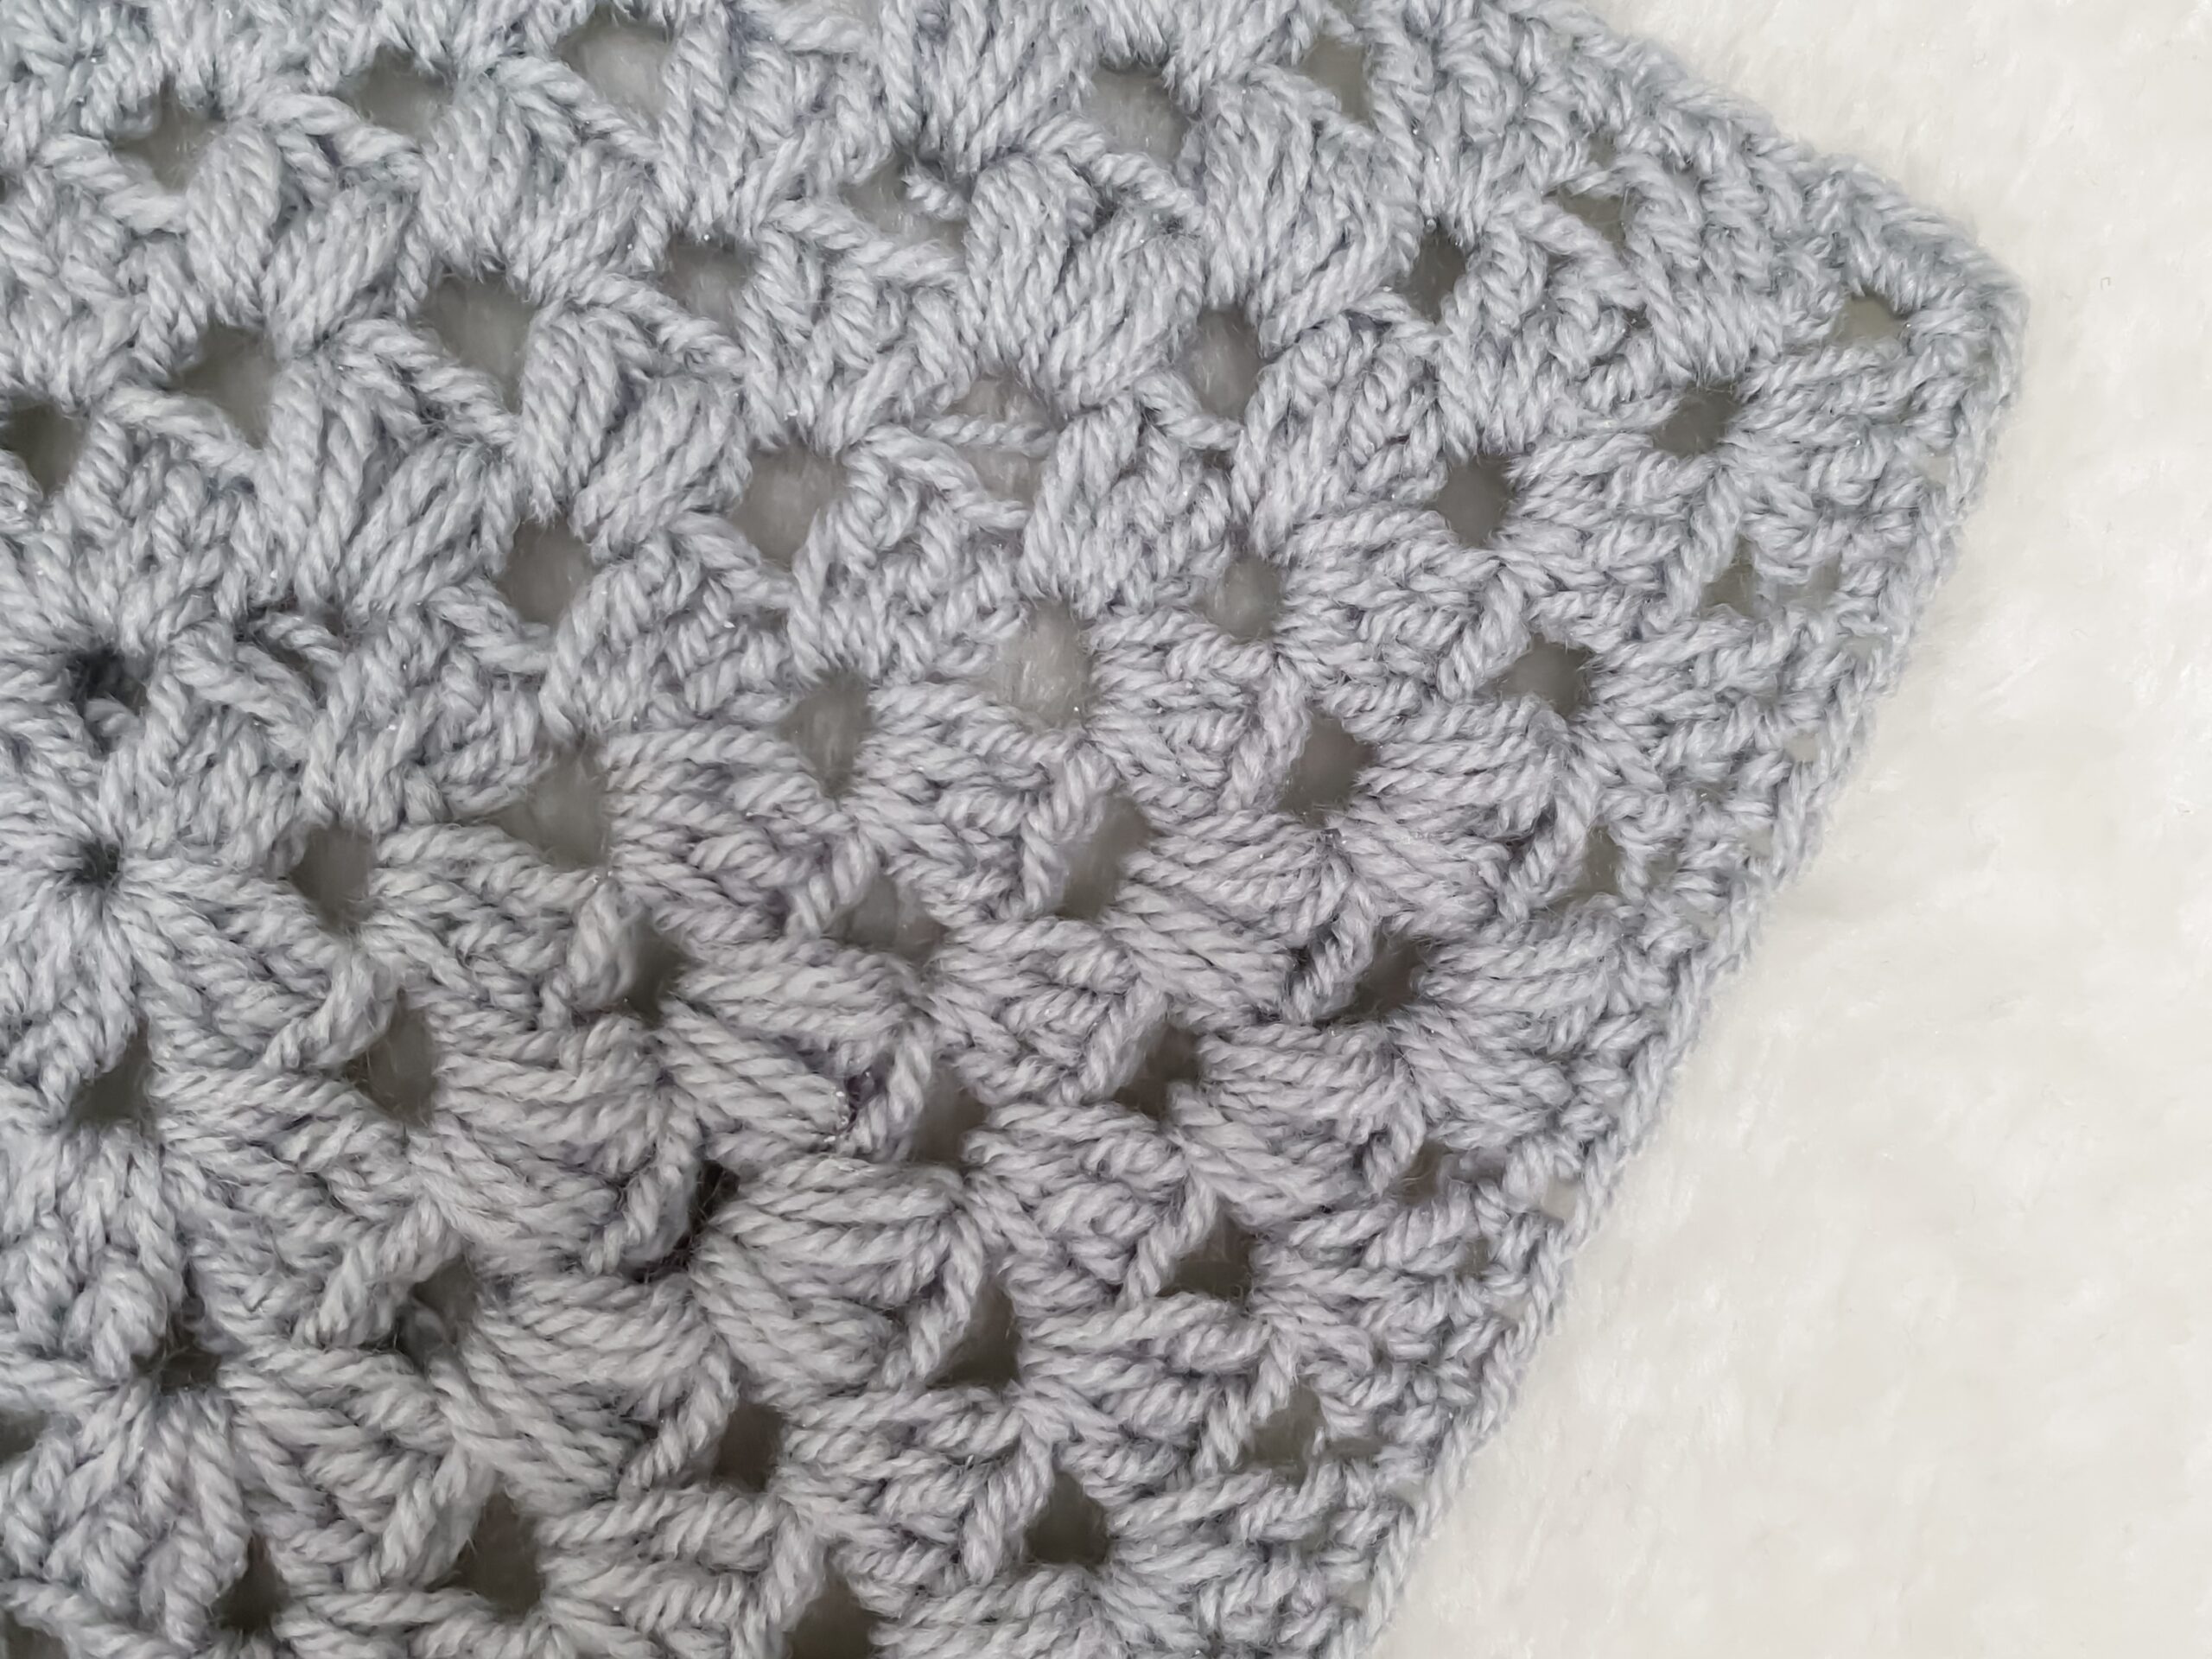
The Puffy Granny Square, crochet granny square, is a great project for those who would like to dip their toes in the world of crochet and granny squares. Adding puff stitches creates slightly textured pattern that compliments double crochet stitches forming granny clusters. The repetitive pattern allows for sufficient practise of the technique creating a beautiful texture. You can make the motif into a placemat, coaster, or a blanket!
This pattern is part of the Granny Square Month event hosted by Marie from Underground Crafter:

Follow the Granny Square Month Crochet Along on Underground Crafter https://undergroundcrafter.com/2026/05/29/2026-granny-square-month-crochet-along/ and enter the giveaway https://kingsumo.com/g/1rj46v3/2026-granny-square-month-crochet-along to win one of 10 fabulous prizes!
Last updated:
Let’s connect! Join my Facebook pattern support and community group here:
Please feel free to join my pattern support Facebook group:
https://www.facebook.com/groups/918351746812273
You can purchase the ads free PDF version of the pattern in my pattern shops at
LoveCrafts here:

or Ravelry here:

This site contains affiliate links to products. We may receive a commission for purchases made through these links at no extra cost to you. This helps to cover the running cost of the website and enables me to continue making free patterns.
Please NOTE that this pattern is subject to copyright and is my intellectual property. The online version is for personal use only. Do not re-publish or sell this pattern in part or full or make video tutorials of it. Any such actions are a breach of copyright and can result in legal action.

Skills required to make crochet granny square:
To create this crochet granny square you will need to master (or already know) these stitches and techniques:
Chain, slip stitch (sl st), single crochet (sc), double crochet (dc), puff stitch (puff), puff v-stitch (puff v-st), blocking.
Skill level:

Finished measurements of crochet granny square:
The final crochet granny square measurements (blocked):
8 x 8 in (20.5 x 20.5 cm)
Materials and tools to make crochet granny square:
Yarn:
To get the exact look as on the pictures of my crochet granny square, you will need:
Hayfield Bonus DK (100% Acrylic | DK | 100 g (3.5 oz) = 280 m (306 yds)),
- Silver Mist #0678 1 skein

Other yarn alternatives:
Please always swatch when substituting yarn:
- PREMIER YARNS: Premier Basix DK
- JAMES C. BRETT: Second Chance DK
For further alternatives, please see:
Hayfield Bonus DK | Substitutes
You can get your craft supplies here.
Tools and notions:
- Crochet hook size 4.0 mm (G/6)
- Tapestry needle
- Scissors

Gauge:
Blocked Gauge:
13 sts x 6 rows = 10 x 10 cm (4 x 4 in) over granny cluster st pattern using 4 mm hook
The gauge is not essential for this crochet granny square, but it will impact the amount of yarn used.
Gauge considerations:
Gauge helps you to understand how the project turns out in terms of the final size. If you would like to achieve the exact size of the final project as in the instructions above, you gauge needs to match exactly to the above.
If you get more stitches and/or rows than stated above using the exact hook size as per instructions, your final project will turn out smaller. Conversely, if you get less stitches and/or rows than stated above using the exact hooks size as per instructions, your final project will turn out bigger.
To make adjustments, if you get more stitches and/or rows, you can try using bigger hook size to get closer to the desired size. Conversely, if you get less stitches and/or rows, you can try using smaller hook size to get closer to the desired size.
It may take trial and error to try out a few hook sizes to achieve the exact size.
Alternatively, if you really don’t want to make several samples to achieve the desired size, you can try to alter your tension as you work the simple double linen stitch washcloth. However, I would advise to try this out once you master the basics of crochet as it may be a bit tiresome to try to master the basics of crochet and focus on alternating your tension while working the project.

Stitch guide for crochet granny square:
Basic crochet stitches:
Sc (single crochet)-insert hook into indicated st, yrh, pull up a lp (2 lps on hook), yrh, pull through 2 lps on hook.
dc (double crochet)- yrh, insert hook into indicated st, yrh, pull up a lp (3 lps on hook), [yrh, pull through 2 lps on hook] twice.
Intermediate crochet stitches:
puff (puff stitch) – yrh, insert hook as indicated in the pattern, yrh, pull up a lp, [yrh, insert hook in the same st, yrh, pull up a lp] 2 times, yrh, pull through all 7 lps on hook, ch 1.
puff V st (puff v-stitch)- (puff st, ch 1, puff st) in indicated st.
gr cl (granny cluster)- group of 3 dc worked into the same space.
Abbreviations:
| Abbreviations used in crochet granny square: | |
| approx.- approximately | rep- repeat |
| beg- beginning | rnd- round |
| ch- chain | RS- right side |
| dc- double crochet | sc- single crochet |
| inc- including | sk- skip |
| lp(s)- loop(s) | sp- space |
| st(s)- stitch(es) | spcs- spaces |
| puff- puff stitch | RS- right side |
| pul- pull up a loop | yrh- yarn round the hook |
| WS- wrong side |
Notes for crochet granny square:
- The square is crocheted in the round.
- Beginning ch 3 counts as 1st st.
- Ch 2 creates corners.
- Instructions enclosed in [] indicate stitches that are worked into the same space/ corner space/ st.
- Instructions between * and ; indicate st pattern repeat.
Instructions to make crochet granny square:
Crochet Granny Square
Rnd 1 (RS): Ch 3 (1st dc), 2 dc in 1st ch, ch 2, [3 dc in the 1st ch, ch 2] three times, sl st in top of beg ch 3.
Rnd 2 (WS): Ch 3 (1st dc), 2 dc in corner space below, [3 dc, ch 2, 3 dc in next corner space] 3 times, 3 dc in next corner space, sl st in top of beg ch 3.
Rnd 3: Ch 3 (1st dc), 2 dc in corner space below, * puff V st in next sp between 2 gr cls, [3 dc, ch 2, 3 dc in next corner space]; rep from * 2 times, puff V st in next sp between 2 gr cls, 3 dc in next corner space, sl st in top of beg ch 3.
Rnd 4: Ch 3 (1st dc), 2 dc in corner space below, * puff V st in the next sp between gr cl and puff V st, puff V st in the next sp between puff V st and gr cl, [3 dc, ch 2, 3 dc in next corner space]; rep from * 2 times, puff V st in the next sp between gr cl and puff V st, puff V st in the next sp between puff V st and gr cl, 3 dc in next corner space, sl st in top of beg ch 3.
Rnd 5: Ch 3 (1st dc), 2 dc in corner space below, * 3 dc in next sp between gr cl and puff V st, puff V st in the next sp between 2 puff V sts, 3 dc in next sp between puff V st and gr cl, [3 dc, ch 2, 3 dc in next corner space]; rep from * 2 times, 3 dc in next sp between gr cl and puff V st, puff V st in the next sp between 2 puff V sts, 3 dc in next sp between puff V st and gr cl, 3 dc in next corner space, sl st in top of beg ch 3.
Rnd 6: Ch 3 (1st dc), 2 dc in corner space below, * puff V st in next sp between 2 gr cls, 3 dc in next sp between gr cl and puff V st, 3 dc in next sp between puff V st and gr cl, puff V st in the next sp between 2 gr cls, [3 dc, ch 2, 3 dc in next corner space]; rep from * 2 times, puff V st in next sp between 2 gr cls, 3 dc in next sp between gr cl and puff V st, 3 dc in next sp between puff V st and gr cl, puff V st in the next sp between 2 gr cls, 3 dc in next corner space, sl st in top of beg ch 3.
Rnd 7: Ch 3 (1st dc), 2 dc in corner space below, * puff V st in the next sp between gr cl and puff V st, puff V st in the next sp between puff V st and gr cl, 3 dc in next sp between 2 gr cls, puff V st in the next sp between gr cl and puff V st, puff V st in the next sp between puff V st and gr cl, [3 dc, ch 2, 3 dc in next corner space]; rep from * 2 times, puff V st in the next sp between gr cl and puff V st, puff V st in the next sp between puff V st and gr cl, 3 dc in next sp between 2 gr cls, puff V st in the next sp between gr cl and puff V st, puff V st in the next sp between puff V st and gr cl, , 3 dc in next corner space, sl st in top of beg ch 3.
Rnd 8: ch 3 (1st dc), 2 dc in corner space below, * 3 dc in next sp between gr cl and puff V st, puff V st in the next sp between 2 puff V sts, 3 dc in next sp between puff V st and gr cl, 3 dc in next sp between gr cl and puff V st, puff V st in the next sp between 2 puff V sts, 3 dc in next sp between puff V st and gr cl, [3 dc, ch 2, 3 dc in next corner space]; rep from * 2 times, 3 dc in next sp between gr cl and puff V st, puff V st in the next sp between 2 puff V sts, 3 dc in next sp between puff V st and gr cl, 3 dc in next sp between gr cl and puff V st, puff V st in the next sp between 2 puff V sts, 3 dc in next sp between puff V st and gr cl, 3 dc in next corner space, sl st in top of beg ch 3.
Rnd 10: Sc in every dc and puff st inc ch-1 sp between puff sts in puff V sts around working 3 sc sts in corner ch-2 sp.
Fasten off.
Finishing steps in crochet granny square:
Weave in all ends and block to final measurements as above.
I would love to see and share your work on social media, use #puffygrannysquare or #exquisitecrochetuk.
Pattern support: exquisite.crochet.uk@gmail.com
Further resources:
Pattern video tutorial for crochet granny square:
For more UK crochet inspiration, check out the UK top bloggers list here:
https://bloggers.feedspot.com/uk_crochet_blogs
For endless crochet inspiration, you can subscribe to AllFreeCrochet website here.
If you prefer to have all your craft inspiration in one place, FaveCrafts is definitely the place to go. Why not subscribe to their newsletter here so you would not miss a thing!
For even more free pattern inspiration from your favourite crochet designers, make sure to check out:

You can purchase the add free PDF version of the pattern at LoveCrafts here and Ravelry here.
Did you enjoy the Puffy Granny Square pattern? Why not try my other small crochet patterns:


Fig Double Linen Stitch Washcloth

Thank you so much if you got this far in the pattern! I hope you got inspired for your own version using different colours. I can’t wait to see it! Don’t forget to tag me on Instagram and let me know in the comment section below how you got on with it! As always, if you have any pattern query, the quickest way to get it answered is by emailing me on the pattern support email address above.
Happy crocheting!
Pin it to your Pinterest boards for inspiration!